Acorn Squash with Ground beef

What would autumn be without squashes? As the weather cools down, the selection and quality of hard squashes available in the store or the farmer’s market is going bananas. Pick up a local acorn squash at your favorite store for this simple ground beef-stuffed acorn squash recipe.

Ingredients

  • 1 large acorn squash
  • 1 lb Rocky Hill Farm grass fed ground beef
  • 1 medium onion
  • 1 apple (I prefer tart variety)
  • 6 slices bacon
  • 1 tbsp fresh rosemary, chopped (or 1 tsp dried rosemary)
  • 2 tsp dried thyme
  • 2 tsp fennel seeds
  • 1 tsp ground sage
  • 1 tsp black pepper
  • 1/2 tsp cinnamon
  • 1/2 tsp sea salt
  • 1/4 tsp nutmeg

Directions

  • Preheat oven to 375ºF (185ºC).
  • Cut the squash in half and scoop the seeds out. Place on the baking sheet lined with foil or parchment paper and roast until the flesh is tender, approximately 45 minutes. Remove and allow to cool to the touch.
  • While the squash is baking, prepare the stuffing. Or do this step ahead of time.
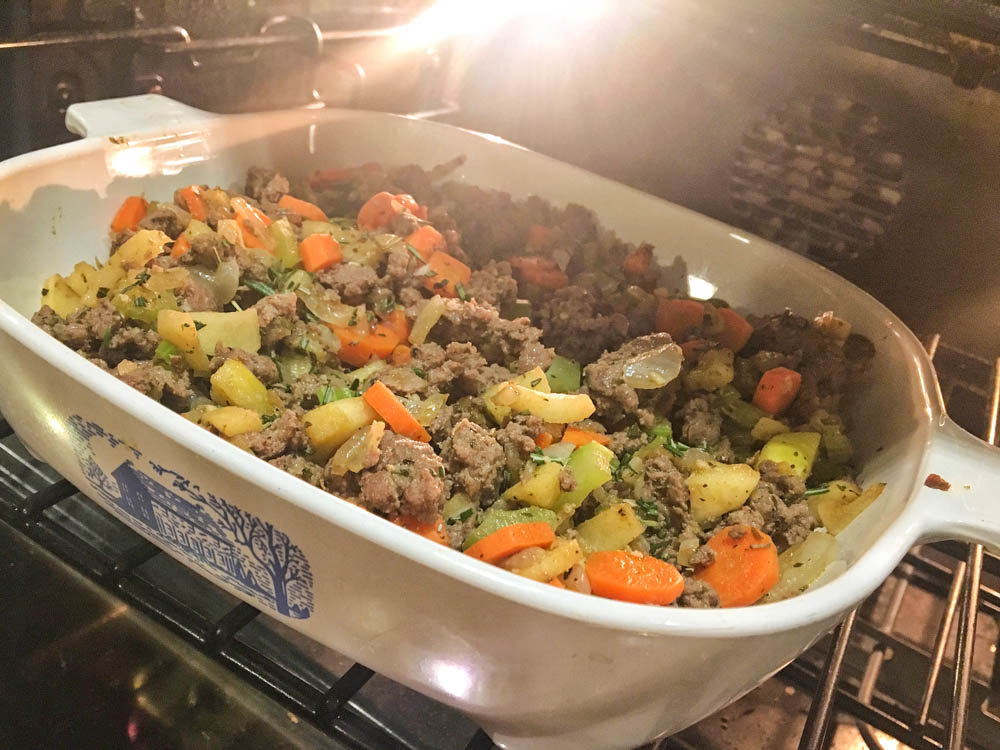
  • Dice the apple and onion into medium-sized pieces. Slice the bacon into pieces.
  • In a large skillet over medium heat, brown the bacon.
  • Add the onion and cook for 5-10 minutes until softened and translucent.
  • Add the apples and cook for another 5-10 minutes.
  • Remove the bacon / onion / apple mixture to a large bowl.
  • In the same skillet over medium-high heat, brown the ground beef.
  • Add all spices and herbs: rosemary, thyme, fennel seeds, sage, pepper, cinnamon, salt and nutmeg. Pour the ground beef into the same large bowl. Stir to combine.
  • When the squash is cool to the touch, use a spoon to scoop out some of the flesh and mix into the beef.
  • Use a spoon to fill the squash boats with the beef mixture.
  • Return the squash to the oven and bake another 15 minutes at 375ºF (185ºC) until everything is heated through.
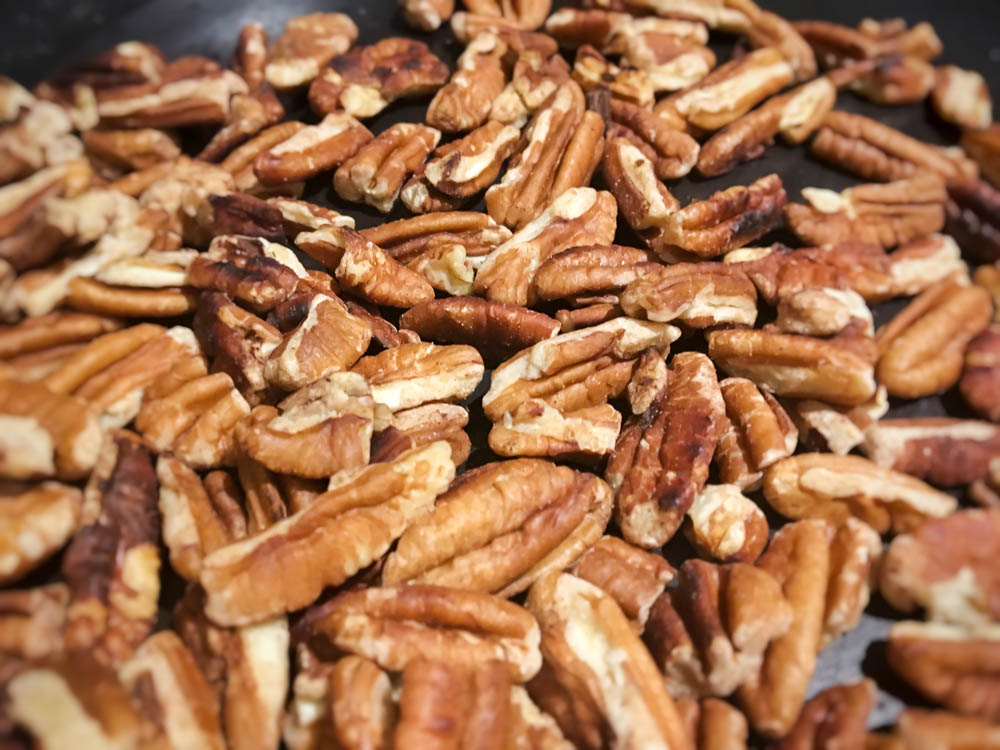
  • While it is in the oven, toast some pecans in a pan over med-high heat and then crush and sprinkle over each stuffed squash.
  • Serve it up!

Simply Lasagna

I know that most people think of lasagna as cool-weather meal but its my go-to when I know its going to be a busy week because its the one dish I can count on my kids looking forward to leftovers.

You can use fresh, homemade sauce for this lasagna, pull a batch out of your freezer or use your favorite jarred variety – any of it will work! Using no-boil lasagna noodles, you can easily put this together in less than 30 minutes and store in the fridge for cooking later or pop in the oven and have on the table in an 45 minutes.

Ingredients

  • No boil lasagna noodles
  • 2 lbs Rocky Hill Farm grass-fed ground beef
  • 2 cloves garlic, chopped
  • 1/2 teaspoon garlic powder
  • 1 teaspoon dried oregano, or to tastesalt and ground black pepper to taste
  • 1 (16 ounce) ricotta cheese
  • 1 (8 ounce) shredded mozzarella cheese
  • 2 eggs
  • 1/2 cup shredded Parmesan cheese
  • 1 1/2 (25 ounce) jars tomato-basil pasta sauce

Directions

  • Preheat oven to 350 degrees F (175 degrees C).
  • Place the ground beef into a skillet over medium heat, add the garlic, garlic powder, oregano, salt, and black pepper to the skillet. Cook the meat, chopping it into small chunks as it cooks, until no longer pink, about 10 minutes. Drain excess grease.
  • In a bowl, mix the ricotta cheese, eggs, and Parmesan cheese until thoroughly combined.
  • Place noodles side by side into the bottom of a 9×13-inch baking pan; top with a layer of the tomato-basil sauce, a layer of ground beef mixture, and a layer of the cottage cheese mixture, and sprinkle with mozzerella.
  • Repeat layers twice more, ending with a layer of sauce; sprinkle top with mozzarella cheese. Cover the dish with aluminum foil.
  • Bake in the preheated oven until the casserole is bubbling and the cheese has melted, about 30 minutes. Remove foil and bake until cheese has begun to brown, about 10 more minutes. Allow to stand at least 10 minutes before serving.

It almost here!

Is your freezer looking a little empty? Not to worry!

We are taking steers in to be processed early May and will have grass fed beef ready to be picked up mid June! 

The beef is USDA inspected, labeled, and vacuum sealed and represents a fine group of steers who have been growing on our local community farms!  

We are selling the beef by the ¼ of a steer (and even 1/8’s).  Orders of ½ of a steer or a full steer may fill out a custom cut sheet from the butcher and have everything cut to spec! We will take orders on a first come, first served basis!

Click here for the ordering form with cut choices and pricing information.  Please return via email or fax.  There is nothing more exciting than local grass-fed beef. Let us know if we can fill your freezer!!

Flank steak tips

Flank steaks are known to absorb marinades extremely well, however, our grass-fed beef has such bold flavor we like to cook it up with just a little olive oil, salt and pepper. This one was cooked for medium rare at a temperature of 135° under the broiler, served with a side of mashed potatoes and green beans. The all-American dinner.

Flank steak tips:

  • Best marinades feature acidic ingredients like citrus juice and red wine or sherry vinegar. Others include soy sauce, ginger, garlic, chilies and onions.
  • Common dishes include fajitas, homemade beef jerky or on its own.
  • Cooking methods: High, dry heat such as grill or broiler
  • Temperatures:
    • Rare – 120°-125°
    • Medium Rare – 130°-135°
    • Medium – 140°-145°
    • Medium Well – 150°-155°
    • Well Done – 160° and above

Share your favorite preparation of a Rocky Hill Farm & Beef flank steak!

5 Tips to Get the Most Out of Your Grass-Fed Beef

Several years ago, consumers often paid more and ended up with tough and bland cuts. This left some negative connotations for the grass-fed beef industry. It turns out that it is likely that these sub-par cuts came from inexperienced farmers.

This is what you need to know to make sure you get the most flavorful and tender grass-fed beef .

  1. Mature cattlegrass fed cattle
    • Most cattle spend their first months consuming predominantly grass and mother’s milk. After that, grain-fed cattle are fed grain to speed weight gain, allowing them to be slaughtered at 18-20 months. Grass-fed cattle allow their cattle to roam freely, only grazing on grass and are slaughtered between 20-28 months. These extra months are what make the most difference in the flavor.
    • Older cows mean more fat marbling and rich color that adds to the flavor.
  2. The right breed
    • Make sure the producer has chosen cattle that are meant to roam continuously, grazing the fields. Certain cattle are bred to flourish on grass alone. (British versus European breeds).
    • This free movement, continuous greenery, fresh air, and sunlight adds to the rich and earthly flavor of the meat.
  3. Grass-fed only
    • Watch out for the dubious spins some producers put on the labels. Pasture raised, for example, means they start of grass-fed (as they all do) but are grain finished. This is no different than grain-fed beef – other than they may have a little more room to roam.
  4. How it is preparedseared steak
    • Follow the same recipes for mature grass-fed steaks cook as you would conventional well-marbled ones.
    • Whether fresh or previously frozen – bring the meat to room temperature and pat dry before cooking. This way the pan doesn’t cool when the meat makes contact.
    • Keep it simple and allow the natural flavors of the beef to come out. No oil or butter needed; as the steak hits the heat, the fat begins to melt, coating the mean and the pan. Just a slight dusting of sea salt and you are all set.
    • Sear in a hot pan. The hotter the pan, the faster the sear. Be sure sear both sides plus the edges – this ensure the juices stay inside. Good rule of thumb is 1 minute each side and then about 2 minutes searing the edges.
    • Turn off the heat and allow the meat to sit about 2 minutes per side. Depending on the thickness this can vary; check the temperature to determine if it is cooked to your liking (rare, medium, well-done).
    • Put on cutting board and cover with hot pan (preferably cast iron) while the meat rests for another 5-10 minutes so the juices can redistribute.
  5. Reputable farm
    BL9A0036

    • Make sure you purchase from a reputable farm or butcher who can provide all the information you need on how the cattle was raised and recommend a cut that is right for you.


Local Flavor: Grass-fed beef NY Strip

The best recipe is sometimes the most simple recipe. Like this easy grilled Rocky Hill Farm & Beef New York strip steak recipe.

Enjoy the flavor of the grass-fed beef  with just a little salt, pepper, and sear marks. It couldn’t be more simple – or delicious.

INSTRUCTIONS

  1. Lightly season both sides with a pinch of salt and pepper.
  2. Rest for 15-30 minutes (if you can wait that long).
  3. Place steaks on hot preheated grill (450°F to 650°F) for approximately 3 minutes per side to make sear marks with the lid open.
  4. Depending on thickness of steaks and desired doneness, you may also rotate the steaks about 90 degrees to form cross-hatch sear marks.
  5. Turn the heat down to medium and move steaks away from the direct heat, either to the warming rack or to the other side of the grill so the steak can finish cooking and close the lid.
  6. Check for doneness using an instant-read thermometer (130°F for rare doneness).
  7. Remove steaks from grill and allow to rest for at least 2 minutes on a warm plate or platter. (The steaks will continue to cook while resting and raise to approximately 140°F for medium rare.)rocky hill grass fed beef steak plated

Local Flavor: Braised grass-fed beef short-ribs

BBQ short ribs are delicious – but braised grass fed short-ribs made with Rocky Hill Farm Beef are obscenely delicious! Short ribs are perfect for the braising pot or dutch oven. They are tough bone-in cuts full of collagen which is melted during a long slow braise making the beef fork-tender.

You will find that the savory aroma that fills your home while they are cooking makes the wait to eat them almost impossible and that is the only difficult part of this recipe. People think it is a lot of work to cook ribs and that isn’t always the case.  These ribs took less than 20 minutes to prep and slow cooked for about 2 hours. I recently discovered The Pioneer Woman and love her simple, flavorful recipes so decided to check out her suggestions for short-ribs. Below is her recipe, with a few minor changes.

INGREDIENTS

  • 3-4 lbs Beef Short Ribs
  • Kosher Salt and Pepper To Taste
  • 1/4 cup All-purpose Flour
  • 6 pieces Pancetta (or bacon), Diced
  • 2 Tablespoons Olive Oil
  • 1 whole Medium Onion, Diced
  • 3 whole Carrots, Diced
  • 2 whole Shallots, Peeled And Finely Minced
  • 2 cups Red Or White Wine
  • 2 cups Beef Or Chicken Broth (enough To Almost Cover Ribs)
  • 2 sprigs Thyme
  • 2 sprigs Rosemary

Start with Rocky Hill Farm Beef short ribs.

Cut them down to about 3 bones per section (if they aren’t already) so they will fit in your pot.

Salt and pepper ribs, then dredge in flour. Set aside.
grass fed short ribs 1
In a large dutch oven, cook pancetta (or bacon) over medium heat until complete crispy and all fat is rendered. Remove and set aside. Do not discard grease.

Add olive oil to pan with the pancetta grease, and raise heat to high. Brown ribs on all sides, about 45 seconds per side. Remove ribs and set aside.
grass fed short ribs 2
Turn heat to medium. Add onions, carrots, and shallots to pan and cook for 2 minutes. Pour in wine and scrape bottom of pan to release all the flavorful bits of glory. Bring to a boil and cook 2 minutes.

Add broth, 1 teaspoon kosher salt, and plenty of freshly ground black pepper. Taste and add more salt if needed. Add ribs to the liquid; they should be almost completely submerged. Add thyme and rosemary sprigs (whole) to the liquid.

Put on the lid and place into the oven. Cook at 350 for 2 hours, then reduce heat to 325 and cook for an additional 30 to 45 minutes. Ribs should be fork-tender and falling off the bone. Remove pan from oven and allow to sit for at least 20 minutes, lid on, before serving. At the last minute, skim fat off the top of the liquid. (Can also refrigerate mixture, then remove solid fat from the top.)

Serve over rice or potatoes.

From the first bite, to the last.

Our grass-fed beef speaks for itself. But we also love to hear back from our clients. Leo, a client and neighbor who has helped on the farm shares his love of Rocky Hill Farm and Beef.

Why did you choose Rocky Hill Farm Beef for your grass fed beef?

I always knew grass fed beef was healthy and delicious, but since working on the farm and seeing the beef operation from all aspects, my opinion of Rocky Hill Farm Beef is even higher. Helping Frank and Mark on the farm has shown me just how caring they are about the animals. The are raised as humanely, healthy, and naturally as possible. These are truly happy steers.

What do you like best about Rocky Hill Farm Beef?

Each order gives you variety of cuts and the high quality of this beef shines through from the first to the last bite.

What is your favorite dish to make from Rocky Hill Farm Beef?

Bacon and mushroom stuffed hamburgers on the grill. Or a simply prepared rib eye – the meat really needs nothing more than salt and pepper to accentuate the free range taste of this grass-fed beef.

4 Step Chili | Hearty & Healthy

Winter is the perfect time for a big bowl of chili. There are countless chili recipes to choose from – beef, chicken, vegetarian, beans, etc. Our favorite combo is black beans and Rocky Hill Farm’s ground beef (of course!).

By cooking with grass fed beef, you are cooking with lean beef and cutting out all that grease while still getting that amazing flavor. This simple recipe is hearty, healthy and can be ready in 30 minutes. chili

  1. Heat oil in heavy large pot over medium-high heat. Add onions and sauté until onions soften, about 10 minutes. Add garlic and sauté another 2-3 minutes (don’t let it burn)
  2. Mix in Rocky Hill Farm ground beef and cook just until the pink is gone.
  3. Stir in beans, 1/2 cup reserved bean liquid.
  4. Mix in chili powder, oregano, cumin, and cayenne; stir 2 minutes. Then add tomato sauce. Bring chili to boil, stirring occasionally. Reduce heat to medium-low and simmer until flavors blend and chili thickens, stirring occasionally, about 15 minutes. Season to taste with salt and pepper.

Ladle chili into bowls. Top off with your choice of chopped cilantro, sour cream, grated cheese, and green onions.

Ingredients
1lb Rocky Hill Farm ground beef
1/4 cup olive oil
2 cups chopped onions
6 garlic cloves, chopped
2 tablespoons chili powder
2 teaspoons dried oregano
1 1/2 teaspoons ground cumin
1/2 teaspoon cayenne pepper
3 15- to 16-ounce cans black beans, drained, 1/2 cup liquid reserved
1 16-ounce can tomato sauce

Toppings
Chopped fresh cilantro
Sour cream
Grated MontereyJack cheese
Chopped green onions